Kettle Maintenance
Hey sisters, just a quick update on the kettle maintenance performed on Saturday. I purchased a stainless steel ball valve, and take-up screen (Bazooka screen) to filter whole hops from the wort as we transferred the wort to the waiting fermentors.
Once the parts arrived I realized I did need a short length of copper tubing, and a threaded fitting so the screen could be attached on the inside of the kettle to the new ball valve. So a trip out to Home Depot began. Once there I found the food-grade solder I needed, a length of copper tubing 5’ of it, I wish I could have just bought a 1 foot length. And I found the threaded fitting to fit the copper tubing.
After digging around in the shop I realized I could not find my torch to weld the copper tubing to the threaded fitting so another run out to the hardware store, and I bought another welding kit with another gas cylinder. Oh well you can never have enough gas right? (Sorry ladies)
I measured the inside of the kettle, and cut the appropriate length of tubing, sanded the ends, and the insides of the Bazooka screen and the copper threaded fitting. Lit the torch and applied flux to the joints. A few minutes later the pieces were nicely welded/soldered together.
Now for the drilling part, to install the Bazooka screen and the ball valve to the kettle it required a 7/8” hole near the bottom of the keg. I marked a spot high enough to keep the screen out of the trub once it settles in the keg, and in between the two handles so it would not get in the way if carried. 10 gallons of wort gets very heavy! Try 80 pounds heavy! I started with a 3/16” drill and drilled a hole on the mark, then I switched to a Step Drill bit. This drill bit is shaped like a cone, and gets bigger and bigger at the base. So as you drill it will make the hole larger, the biggest part of the drill bit was 7/8” so basically I drilled until I was at the biggest point. I test fit the pieces together and they were perfect.
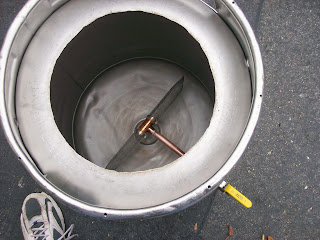
So a little clean up on the inside of the kettle (remove the metal shavings, and the oil used to lubricate the drill bits) and put the parts together. The pictures are of the final assembly of the brew kettle ball valve and Bazooka screen. This will make transferring the wort to the fermentors a snap! Not to mention without any mess, or heaven forbid, spilled wort/beer!


No comments:
Post a Comment